Image guides
Image too large to upload? Find the limit, then fix only that
If the error gives a maximum in KB or MB for one file, enter that limit in the target-size compressor and check the downloaded copy. Pixel dimensions, file types and limits on several images need different fixes. If the message says combined image content or overly compressed, start with those checks below.
Files are processed locally.
On this page
Which limit failed?
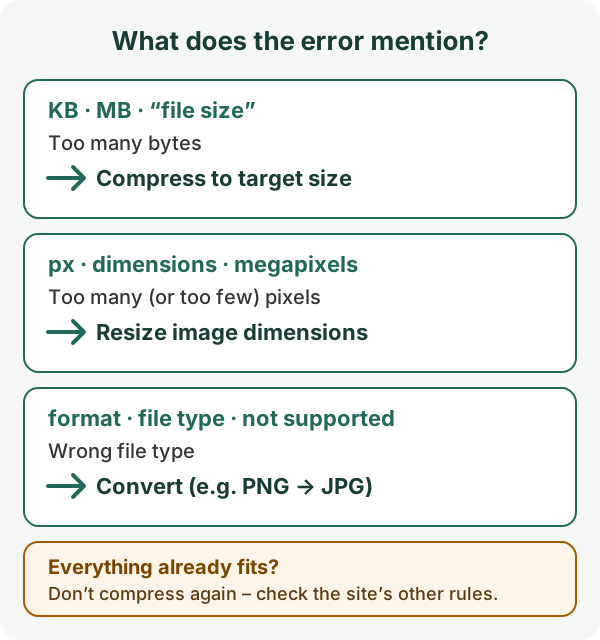
- File size is how much storage the file takes: “max. 2 MB”, “under 200 KB”.
- Dimensions are width × height in pixels: “at least 1200 px wide”, “no more than 20 megapixels”.
- Format is the actual file type: “JPG or PNG only”. Renaming
photo.pngtophoto.jpgdoes not change it.
“Combined resolved image content is too large”
This wording points to the images submitted together. It does not tell you a universal MB limit or identify the service that produced it. First check the receiving app's rules for image count, total request size and dimensions:
- Try one required image. If it works alone but the group fails, try a smaller group where the task allows separate submissions. That suggests a combined limit; it does not prove which limit was reached.
- If the error asks for smaller dimensions, use Resize image dimensions. Lowering JPEG quality reduces stored bytes without reducing the number of pixels to process.
- If one image still fails within the published rules, keep the exact error, image count, dimensions and byte sizes for the app's support. Do not keep reducing quality at random.
“Image is overly compressed”: use a better original
More compression goes in the wrong direction here. Return to the camera original or the least-compressed copy, then export once at higher quality while respecting the required dimensions and maximum file size. Saving a damaged JPEG at higher quality cannot restore lost detail; adding bytes alone does not improve the photo.
A compression ratio such as 20:1 is not a JPEG quality setting of 20. For example, the U.S. visa digital-image requirements specify a compression ratio no greater than 20:1 alongside separate pixel and file-size rules. Follow your actual form's requirements; this is not a rule for every upload, and Refentra's target-size compressor does not certify that ratio.
File too big: compress to the site's limit
- Open the target-size compressor and choose your image (JPG, PNG or WebP).
- Under Maximum file size, type the site's number and pick KB or MB. The quick buttons cover 50 KB, 100 KB, 200 KB and 2 MB.
- If the site accepts only JPG, open Further requirements and set Allowed format to JPG required. Otherwise a PNG becomes WebP, which many upload forms do not accept.
- Tap Prepare image. When the status says Target reached, use Download result and upload that downloaded copy.
Measured with Refentra's own sample photo (1536 × 1024 px), JPG required, 200 KB target:
Both files are 1536 × 1024 px; only the encoding changed. Recorded on 20 September 2026 in desktop Chromium (Refentra build c41889a). You can download the original and the result. Another browser can produce a slightly different byte count.


When the target cannot be reached
The compressor never lowers JPEG or WebP quality below 35 (on a scale of 100). If the limit is still missed at that point, it shows The file-size limit was not met and offers the attempt only as a clearly labelled download above the limit. Do not upload that file.
Example: our sample photo with a 5 KB target ended at 73,851 bytes at quality 35. The fix is fewer pixels: start again from the original, open Further requirements and enter a Maximum width (px), for example 1200 or 800. Size and pixels are then handled in one step, without saving the photo twice.

Wrong width or height: resize the pixels
Check which kind of rule the site uses, because each needs a different setting:
- Maximum (“up to 4000 px”): use Resize image dimensions with Fit within maximum dimensions. The whole picture stays, nothing is stretched.
- Exact (“1080 × 1080 px”): choose Exact area with padding to keep the whole picture with borders, or Crop to exact dimensions to fill the frame and lose the edges.
- Minimum (“at least 1200 px”): a smaller photo cannot gain real detail. Use a larger original if you have one; enlarging only makes it softer.
If you also need to stay under a file size, use the compressor's maximum width and height fields instead, so both limits are met in one result.
File type not accepted: convert it
- PNG not accepted → PNG to JPG
- WebP not accepted → WebP to JPG
- iPhone HEIC photo not accepted → HEIC to JPG (see the HEIC guide)
Check the result before you upload
Still rejected although everything fits?
Stop compressing; more compression will only make the picture worse.
If you see 413 Content Too Large or Payload Too Large, the server is rejecting the request size. A request can include several files and other data, so a per-file check alone may pass. Only the site operator can confirm or change its server limit.
- Re-read the rules for a second limit: a minimum size, an aspect ratio, a maximum number of files or a different limit for your upload category.
- Check the real file type and byte count in the file's properties, not the filename.
- Reload the page, check your connection and the site's storage or account limits, then try again.
- Contact the site's support with the exact error text. Only the site can say why it rejects a file that meets its published rules.
Platform specifics: Gmail attachments, Shopify under 20 MB, Etsy listing photos and a PDF that must stay under a limit. All limits in one place: upload limits by platform.
For developers: boundary test files
Building an upload form with a 200,000-byte limit? The upload test set contains synthetic PNGs of exactly 199,999, 200,000 and 200,001 bytes, a PNG named .jpg and a truncated file, with a manifest of hashes and expected results. The owner allowed reuse of these six inputs for testing and explaining upload rules on 20 September 2026; the README states the exact terms. A size check alone does not prove the image is valid, so the receiving server still needs its own checks.
About this guide
Tool settings were checked against Refentra's current code. The measured results come from the recorded run listed in the test manifest (settings, bytes and SHA-256 hashes). No result here proves that a particular site will accept a file. This guide was drafted and edited with AI assistance.