Image guides
Convert an iPhone HEIC photo to JPG without uploading it
On a computer, open Refentra's HEIC to JPG converter, choose the photo and select Create JPG copy; the photo never leaves your device. It handles photos up to 48 megapixels, so the 24 MP and 48 MP photos of recent iPhones fit. On the iPhone itself, exporting a JPEG with Preview is usually the simpler route, as shown below.
Files are processed locally.
On this page
Which route fits your photo
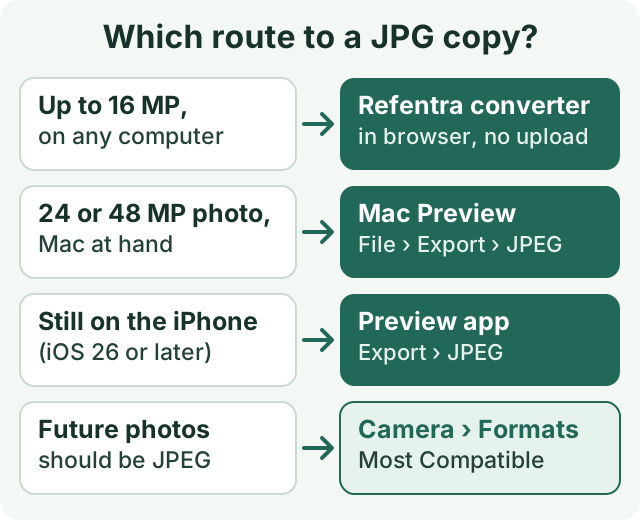
HEIC is the format iPhones use by default because it stores a photo in less space than JPEG. Many upload forms, Windows PCs without HEIC support and office software still expect JPEG, so the same photo opens on your iPhone but is refused elsewhere. Renaming .heic to .jpg does not help; the picture has to be re-encoded into a new JPEG file.
On a computer: convert in the browser (up to 48 MP)
- Open the HEIC to JPG converter and choose one
.heicor.heifstill photo (up to 25 MiB and 48 MP). - Leave JPEG quality at 90 for a photo you want to keep. Any value from 40 to 100 works; lower values give smaller files with less fine detail.
- Select Create JPG copy. The result shows the dimensions, format and file size.
- Check the preview, then select Download JPG. Your HEIC original stays unchanged.
The JPG keeps the photo's displayed width, height and orientation. It does not keep the source metadata (including GPS location and capture date), HDR, depth data or Live Photo motion, and transparent areas become white. For several photos, the batch converter converts up to 25 images in one run, but it keeps a 16 MP limit for HEIC; convert 24 and 48 MP photos one at a time here.
That measured example with libheif's public test image shows a common surprise: the JPG copy is often larger than the HEIC original. If a size limit is the problem, use the target-size compressor on the JPG afterwards.
On the iPhone: export a JPEG copy with Preview
- Preview opens files from the Files app. If the photo is only in your Photos library, save it to Files first with Share › Save to Files.
- In the Preview app, open the image, tap the menu next to the filename and tap Export.
- Select JPEG. Drag the Size slider left for a smaller file or right for higher quality.
- Choose where to save the copy and tap Save.
This works regardless of resolution, so it is the simplest route while the photo is still on your iPhone. The Preview app and these steps are from Apple's iPhone User Guide for iOS 26 and later; see Export or compress PDFs and images in Preview on iPhone.
On a Mac: Preview or Finder
- Open the photo in Preview and choose File › Export.
- Select JPEG as the format, set the quality slider and save the copy under a new name.
- Faster for several files: select them in Finder, Control-click, then choose Quick Actions › Convert Image and pick JPEG and a size.
Apple documents both: converting file types in Preview and Quick Actions in Finder. If Convert Image is missing, use Preview.
Photo rejected as too large?
If the browser converter says your photo has more than 48 MP, the file is fine; it is a memory limit of this tool. Lowering the JPEG quality will not help, because reading the original is the step that needs the memory.
On an iPhone or iPad, Safari can also stop above about 16 MP, even for a photo within the limit. The converter then says that this browser cannot create a JPG this large. That is a memory limit of the device's browser, not of the file. So far, Refentra has checked 24 and 48 MP conversion in a desktop browser, not on physical phones. In either case, use one of these instead:
- Open the browser converter on a computer, if the photo is within 48 MP.
- Export the JPEG on the iPhone with the Preview app (above).
- Export it on a Mac with Preview or Finder (above).
- On a Windows PC, import photos over a USB cable: Apple notes that HEIC photos may then be converted to JPEG automatically, unless the iPhone is set to Keep Originals.
Get JPEG directly from the camera
If you regularly need JPEG, change the camera format once. This only affects new photos; it does not convert photos already in your library.
- Save new photos as JPEG
- Settings › Camera › Formats › Most Compatible
- Save 12 MP instead of 24 MP
- Settings › Camera › Formats › Photo Mode › 12 MP (supported models)
- Allow automatic conversion when importing to a computer
- Do not choose Keep Originals under Settings › Apps › Photos
Apple Support: Using HEIF or HEVC media and Change advanced camera settings on iPhone, checked 2026-10-04.
Before you send the JPG
- Open the copy and check that orientation, colours and fine detail look right.
- Check the file size against the limit of the site or form you are using.
- Keep the HEIC original in case you need another export later.
A JPG made by Refentra's converter contains no location data from the original. Copies made by other apps can keep it; check them with the metadata viewer and see removing location data from a photo. If the JPG is still rejected, the image too large to upload guide helps you find out whether bytes, pixels or the format is the problem.
This guide was written with AI assistance. The converter steps and the measured example were checked against Refentra's current tool; the Apple steps come from the linked Apple documentation and were not tested on every device.